
AutoUpdater.NET is a class library that allows .NET developers to easily add auto-update functionality to their classic desktop application projects.


PM> Install-Package Autoupdater.NET.Official- .NET Framework 4.6.2 or above
- .NET Core 3.1
- .NET 5.0 or above
- Windows 8 or above
- Windows version lower than 8 requires .NET Framework 4.5 or above installed for ZipExtractor to work. You can use the installer instead of a zip file as an update file to avoid this issue.
This library only works for WinForms or WPF application projects.
AutoUpdater.NET downloads the XML file containing update information from your server. It uses this XML file to get the information about the latest version of the software. If the latest version of the software is greater than the current version of the software installed on the User's PC, then AutoUpdater.NET shows an update dialog to the user. If they press the update button to update the software, then It downloads the update file (Installer) from URL provided in the XML file and executes the installer file it just downloaded. It is the job of the installer after this point to carry out the update. If you provide zip file URL instead of installer, then AutoUpdater.NET will extract the contents of the zip file to the application directory.
AutoUpdater.NET uses an XML file located on a server to get the release information about the latest version of the software. You need to create an XML file like below, and then you need to upload it to your server.
<?xml version="1.0" encoding="UTF-8"?>
<item>
  <version>2.0.0.0</version>
  <url>https://rbsoft.org/downloads/AutoUpdaterTest.zip</url>
  <changelog>https://github.com/ravibpatel/AutoUpdater.NET/releases</changelog>
  <mandatory>false</mandatory>
</item>
There are two things you need to provide in an XML file, as you can see above.
-
version (Required): You need to provide the latest version of the application between version tags. Version should be in X.X.X.X format.
-
url (Required): You need to provide the URL of the latest version installer file or zip file between url tags. AutoUpdater.NET downloads the file provided here and installs it when the user presses the Update button.
-
changelog (Optional): You need to provide the URL to the change log of your application between changelog tags. If you don't provide the URL of the changelog, then the update dialog won't show the change log.
-
mandatory (Optional): You can set this to true if you don't want the user to skip this version. This will ignore Remind Later and Skip options and hide both Skip and Remind Later buttons on the update dialog.
- mode (Attribute, Optional): You can provide a mode attribute on a mandatory element to change the behavior of the mandatory flag. If you provide "1" as the value of the mode attribute, then it will also hide the Close button on the update dialog. If you provide "2" as the value of the mode attribute, then it will skip the update dialog and start downloading and updating the application automatically.
<mandatory mode="2">true</mandatory>
- minVersion (Attribute, Optional): You can also provide minVersion attribute on a mandatory element. When you provide it, the Mandatory option will be triggered only if the installed version of the app is less than the minimum version you specified here.
<mandatory minVersion="1.2.0.0">true</mandatory>
-
executable (Optional): You can provide the path of the executable if it was changed in the update. It should be relative to the installation directory of the application. For example, if the new executable is located inside the bin folder of the installation directory, then you should provide it as shown below.
<executable>bin\AutoUpdaterTest.exe</executable>- args (Optional): You can provide command line arguments for Installer between this tag. You can include %path% with your command line arguments, it will be replaced by the path of the directory where the currently executing application resides.
- checksum (Optional): You can provide the checksum for the update file between this tag. If you do this, AutoUpdater.NET will compare the checksum of the downloaded file before executing the update process to check the integrity of the file. You can provide an algorithm attribute in the checksum tag to specify which algorithm should be used to generate the checksum of the downloaded file. Currently, MD5, SHA1, SHA256, SHA384, and SHA512 are supported.
<checksum algorithm="MD5">Update file Checksum</checksum>You can also use the XML creator tool created by one of the users to create the XML file. You can download it from here.
After you are done creating and uploading the XML file, It is straightforward to add an auto-update functionality to your application.
First, you need to add the following line at the top of your form.
using AutoUpdaterDotNET;Now you need to add the following line to your main form constructor or in Form_Load event. You can add this line anywhere you like. If you don't like to check for update when the application starts, then you can create a Check for update button and add this line to the Button_Click event.
AutoUpdater.Start("https://rbsoft.org/updates/AutoUpdaterTest.xml");Start method of AutoUpdater class takes the URL of the XML file you uploaded to the server as a parameter.
AutoUpdater.Start should be called from the UI thread.
AutoUpdater.NET uses Assembly version to determine the current version of the application. You can update it by going to Properties of the project as shown in the following screenshot.
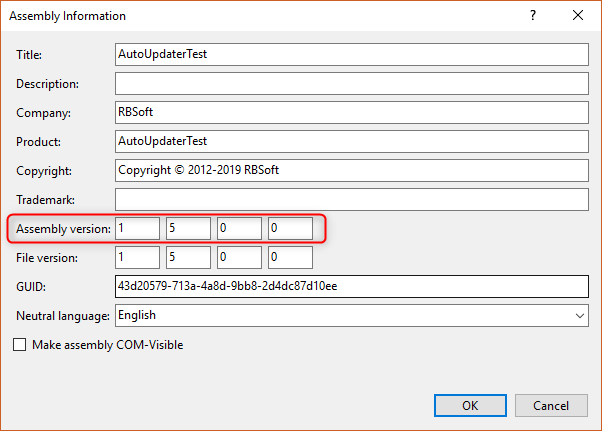
The version specified in the XML file should be higher than the Assembly version to trigger the update.
If you want to provide your own Assembly, then you can do it by providing the second argument of the Start method as shown below.
AutoUpdater.Start("https://rbsoft.org/updates/AutoUpdaterTest.xml", myAssembly);If you don't want AutoUpdater.NET to determine the installed version from assembly, then you can provide your own version by assigning it to the InstalledVersion field as shown below.
AutoUpdater.InstalledVersion = new Version("1.2");If you like to use ftp XML URL to check for updates or download the update file, then you can provide your FTP credentials in the alternative Start method as shown below.
AutoUpdater.Start("ftp://rbsoft.org/updates/AutoUpdaterTest.xml", new NetworkCredential("FtpUserName", "FtpPassword"));If you are using FTP download URL in the XML file, then credentials provided here will be used to authenticate the request.
If you want to check for updates synchronously, then set Synchronous to true before starting the update as shown below.
AutoUpdater.Synchronous = true;If you don't want to show the Skip button on the Update form, then just add the following line with the above code.
AutoUpdater.ShowSkipButton = false;If you don't want to show the Remind Later button on the Update form, then just add the following line with the above code.
AutoUpdater.ShowRemindLaterButton = false;If you want to ignore previously set Remind Later and Skip settings, then you can set Mandatory property to true. It will also hide the Skip and Remind Later button. If you set Mandatory to true in code, then the value of Mandatory in your XML file will be ignored.
AutoUpdater.Mandatory = true;You can enable forced updates by setting Mandatory property to true and setting UpdateMode to value of Mode.Forced or
Mode.ForcedDownload. Mode.Forced option will hide Remind Later, Skip, and Close buttons on the standard update
dialog. Mode.ForcedDownload option will skip the standard update dialog and start downloading and updating the
application without user interaction. Mode.ForceDownload option will also ignore the value of the OpenDownloadPage
flag.
AutoUpdater.Mandatory = true;
AutoUpdater.UpdateMode = Mode.Forced;You can provide Basic Authentication for XML, Update a file, and Change Log as shown in the below code.
BasicAuthentication basicAuthentication = new BasicAuthentication("myUserName", "myPassword");
AutoUpdater.BasicAuthXML = AutoUpdater.BasicAuthDownload = AutoUpdater.BasicAuthChangeLog = basicAuthentication;
Set the User-Agent string to be used for HTTP web requests so you can differentiate them in your web server request logs.
AutoUpdater.HttpUserAgent = "AutoUpdater";You can turn on error reporting by adding the below code. If you do this, AutoUpdater.NET will show an error message if there is no update available or if it can't get to the XML file from the web server.
AutoUpdater.ReportErrors = true;If your application doesn't need administrator privileges to replace the old version, then you can set RunUpdateAsAdmin to false.
AutoUpdater.RunUpdateAsAdmin = false;If you don't want to download the latest version of the application and just want to open the URL between url tags of your XML file, then you need to add the following line with the above code.
AutoUpdater.OpenDownloadPage = true;This kind of scenario is useful if you want to show some information to users before they download the latest version of the application.
If you don't want users to select Remind Later time when they press the Remind Later button of the update dialog, then you need to add the following lines with the above code.
AutoUpdater.LetUserSelectRemindLater = false;
AutoUpdater.RemindLaterTimeSpan = RemindLaterFormat.Days;
AutoUpdater.RemindLaterAt = 2;
In the above example, when a user presses the Remind Later button of the update dialog, It will remind the user for update after 2 days.
If your XML and Update file can only be used from a certain Proxy Server, then you can use the following settings to tell AutoUpdater.NET to use that proxy. Currently, if your Changelog URL is also restricted to Proxy server, then you should omit the changelog tag from the XML file cause it is not supported using Proxy Server.
var proxy = new WebProxy("ProxyIP:ProxyPort", true)
{
    Credentials = new NetworkCredential("ProxyUserName", "ProxyPassword")
};
AutoUpdater.Proxy = proxy;You can specify where you want to download the update file by assigning the DownloadPath field as shown below. It will be used for ZipExtractor too.
AutoUpdater.DownloadPath = Application.StartupPath;If you are using a zip file as an update file, then you can set the "InstallationPath" equal to the path where your app is installed. This is only necessary when your installation directory differs from your executable path. Make sure the directory you specify exists before assigning it to the InstallationPath field.
AutoUpdater.InstallationPath = Application.StartupPath;If you are using a zip file as an update file, then you can set "ExecutablePath" equal to a new executable path relative to the installation directory. This is only necessary if your new executable path differs from the current executable path. The "executable" value defined in XML takes precedence over this value.
AutoUpdater.ExecutablePath = "bin\\AutoUpdater.exe";Sometimes it is necessary to clear previous version files before doing an update. In this case, you can specify whether to clear the application directory before extracting the update file using the below code.
AutoUpdater.ClearAppDirectory = true;You can specify the size of the update form by using the below code.
AutoUpdater.UpdateFormSize = new System.Drawing.Size(800, 600);You can change the icon of the update form by using the below code. It assumes that you have an image resource named Icon in your project. The size of an icon file should be 64x64.
AutoUpdater.Icon = Resources.Icon;To ensure the dialogs showed by the auto updater are visible and always focused correctly related to an application Form or Window, it may be necessary to set an owner. You can assign a Form or WPF Window as the owner by following the example below.
AutoUpdater.SetOwner(yourMainFormOrWpfWindow);To ensure that the dialogs displayed by the auto updater are always on top, you can set the "TopMost" to true, as demonstrated in the code snippet below.
AutoUpdater.TopMost = true;You can change how AutoUpdater.NET saves the Remind Later and Skip values by assigning the PersistenceProvider. If you don't provide a PersistenceProvider, then it will save the values in the Windows registry.
If you are using .NET 4.0 or above, then you can use JsonFilePersistenceProvider instead of the default RegistryPersistenceProvider as shown below.
string jsonPath = Path.Combine(Environment.CurrentDirectory, "settings.json");
AutoUpdater.PersistenceProvider = new JsonFilePersistenceProvider(jsonPath);
You can create your own PersistenceProvider by implementing IPersistenceProvider interface.
You can call the Start method inside Timer to check for updates frequently.
System.Timers.Timer timer = new System.Timers.Timer
{
    Interval = 2 * 60 * 1000,
    SynchronizingObject = this
};
timer.Elapsed += delegate
{
    AutoUpdater.Start("https://rbsoft.org/updates/AutoUpdaterTest.xml");
};
timer.Start();DispatcherTimer timer = new DispatcherTimer {Interval = TimeSpan.FromMinutes(2)};
timer.Tick += delegate
{
AutoUpdater.Start("https://rbsoft.org/updates/AutoUpdaterTestWPF.xml");
};
timer.Start();If you like to handle Application exit logic yourself, then you can use ApplicationExitEvent like below. This is invaluable if you like to do something before closing the application.
AutoUpdater.ApplicationExitEvent += AutoUpdater_ApplicationExitEvent;

private void AutoUpdater_ApplicationExitEvent()
{
    Text = @"Closing application...";
    Thread.Sleep(5000);
    Application.Exit();
}Sometimes as a developer you need to maintain the look and feel of the entire application similarly, or you need to do something before update. In this type of scenarios you can handle the updates manually by subscribing to an event. You can do it by adding the following line with the above code.
AutoUpdater.CheckForUpdateEvent += AutoUpdaterOnCheckForUpdateEvent;

private void AutoUpdaterOnCheckForUpdateEvent(UpdateInfoEventArgs args)
{
    if (args.Error == null)
    {
        if (args.IsUpdateAvailable)
        {
            DialogResult dialogResult;
            if (args.Mandatory.Value)
            {
                dialogResult =
                    MessageBox.Show(
                        $@"There is new version {args.CurrentVersion} available. You are using version {args.InstalledVersion}. This is required update. Press Ok to begin updating the application.", @"Update Available",
                        MessageBoxButtons.OK,
                        MessageBoxIcon.Information);
            }
            else
            {
                dialogResult =
                    MessageBox.Show(
                        $@"There is new version {args.CurrentVersion} available. You are using version {
                                args.InstalledVersion
                            }. Do you want to update the application now?", @"Update Available",
                        MessageBoxButtons.YesNo,
                        MessageBoxIcon.Information);
            }

            // Uncomment the following line if you want to show standard update dialog instead.
            // AutoUpdater.ShowUpdateForm(args);

            if (dialogResult.Equals(DialogResult.Yes) || dialogResult.Equals(DialogResult.OK))
            {
                try
                {
                    if (AutoUpdater.DownloadUpdate(args))
                    {
                        Application.Exit();
                    }
                }
                catch (Exception exception)
                {
                    MessageBox.Show(exception.Message, exception.GetType().ToString(), MessageBoxButtons.OK,
                        MessageBoxIcon.Error);
                }
            }
        }
        else
        {
            MessageBox.Show(@"There is no update available please try again later.", @"No update available",
                MessageBoxButtons.OK, MessageBoxIcon.Information);
        }
    }
    else
    {
        if (args.Error is WebException)
        {
            MessageBox.Show(
                @"There is a problem reaching update server. Please check your internet connection and try again later.",
                @"Update Check Failed", MessageBoxButtons.OK, MessageBoxIcon.Error);
        }
        else
        {
            MessageBox.Show(args.Error.Message,
                args.Error.GetType().ToString(), MessageBoxButtons.OK,
                MessageBoxIcon.Error);
        }
    }
}
When you do this, it will execute the code in the above event when the AutoUpdater.Start method is called instead of showing the update dialog.
- IsUpdateAvailable (bool): If the update is available, then returns true otherwise false.
- DownloadURL (string): The Download URL of the update file.
- ChangelogURL (string): URL of the webpage specifying changes in the new update.
- CurrentVersion (Version): The newest version of the application is available to download.
- InstalledVersion (Version): Version of the application currently installed on the user's PC.
- Mandatory (Mandatory): Shows if the update is required or optional.
If you want to use another format instead of XML as an AppCast file, then you need to handle the parsing logic by subscribing to ParseUpdateInfoEvent. You can do it as follows.
AutoUpdater.ParseUpdateInfoEvent += AutoUpdaterOnParseUpdateInfoEvent;
AutoUpdater.Start("https://rbsoft.org/updates/AutoUpdaterTest.json");

private void AutoUpdaterOnParseUpdateInfoEvent(ParseUpdateInfoEventArgs args)
{
    dynamic json = JsonConvert.DeserializeObject(args.RemoteData);
    args.UpdateInfo = new UpdateInfoEventArgs
    {
        CurrentVersion = json.version,
        ChangelogURL = json.changelog,
        DownloadURL = json.url,
        Mandatory = new Mandatory
        {
            Value = json.mandatory.value,
            UpdateMode = json.mandatory.mode,
            MinimumVersion = json.mandatory.minVersion
        },
        CheckSum = new CheckSum
        {
            Value = json.checksum.value,
            HashingAlgorithm = json.checksum.hashingAlgorithm
        }
    };
}{
"version":"2.0.0.0",
"url":"https://rbsoft.org/downloads/AutoUpdaterTest.zip",
"changelog":"https://github.com/ravibpatel/AutoUpdater.NET/releases",
"mandatory":{
"value":true,
"minVersion": "2.0.0.0",
"mode":1
},
"checksum":{
"value":"E5F59E50FC91A9E52634FFCB11F32BD37FE0E2F1",
"hashingAlgorithm":"SHA1"
}
}You can follow the below steps to build the project on your local development environment.
-
Disable signing from project properties of both AutoUpdater.NET and ZipExtractor.
-
Edit both .csproj files of AutoUpdater.NET and ZipExtractor and change the following line. Use the .NET version you prefer.
Before
<TargetFrameworks>net462;netcoreapp3.1;net5.0-windows</TargetFrameworks>
After
<TargetFramework>net5.0-windows</TargetFramework>
-
Build ZipExtractor project in "Release" configuration to create the executable in the Resources folder. While compiling it for .NET Core 3.1 or above, you have to use publish command instead of build as shown here and copy the resulting executable to the "AutoUpdater.NET/Resources" folder.
-
Visual Studio 2026 doesn't allow building .NET Framework 4.5 by default, so if you are using Visual Studio 2022, then you can change it to any supported .NET version, or you have to follow steps from here to use .NET Framework 4.5.